Removing Your Harvest From the Field & Meat Care
No-Mess (Gutless) Field Dressing/Quartering
You can leave the guts intact and remove sections of meat by skinning your animal and quartering it in place. Below is a video on this method, in which you can quickly field dress an elk with little mess.
When to remove or NOT to remove the hide?
If the air temperature is less than 40 degrees, the hide can be left. This situation is commonly found in December during the cow firearm season. If the air temperature is hot, then the hide should be removed. The skin helps to contain the body heat, which increases the chance of meat spoilage. Keeping the skin on the meat and adding ice will not help keep the meat cool.
Multiple cuts through the hide increase the chance of getting hair on the meat, so try to keep the number of cuts through the hide to a minimum. The outside of the hide is dirty so try to keep meat from contacting it. Recall what we learned in the previous section! Bull elks urinate in wallows and then roll in it to increase their masculine scent.
- Not having Elk mounted
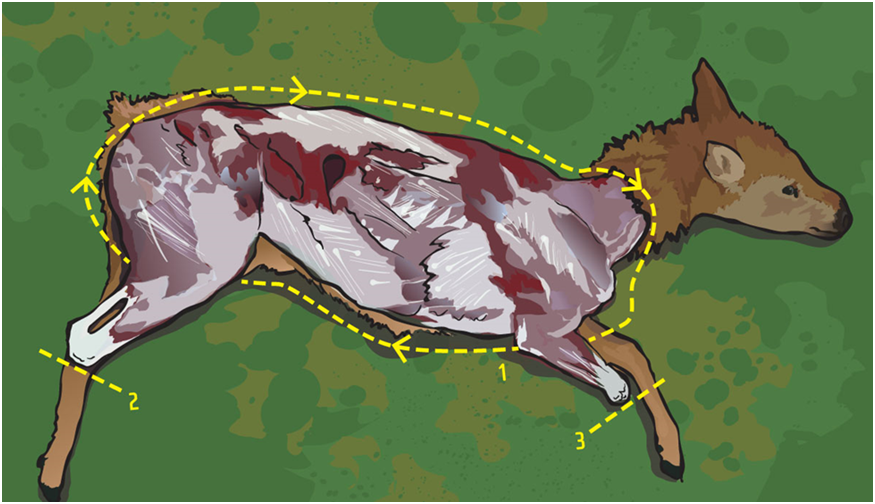 Image Source: Adrienne Yancy/Obie Williams
- Lay animal on its side and make a cut along the spine from the tail to head.
- Cut the skin from the underlying muscles down to second joint on the legs.
- A second person can assist you in pulling the skin off the body cavity. This helps the connective tissue to be tight which will make cutting easier.
- Be careful and watch the knife close so you or your helper does not get injured.
- Make a cut below each leg joint and cut all the way around the leg.
- Remove the hide
- Using a saw, cut straight through the bone below the second joint on front leg.
- On hind leg, leave the major tendon on the back of the leg intact. A hole between this tendon and the leg bone can help you carry and hang the rear quarter.
- Removing the Shoulders
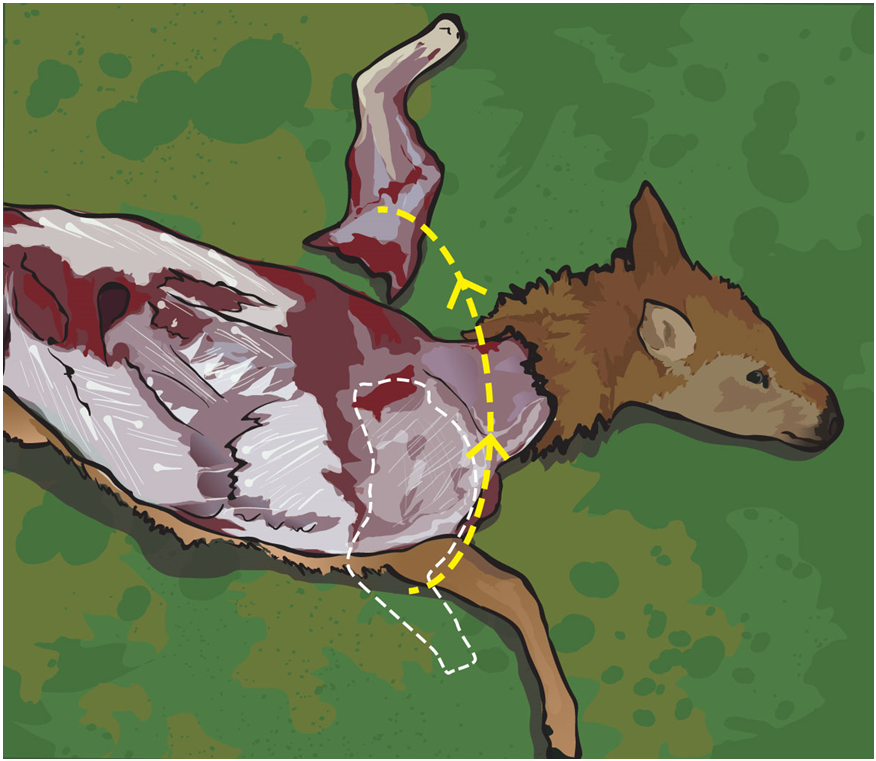 Image Source: Adrienne Yancy/Obie Williams
- Have someone lift the front leg away from the body. There is not a shoulder joint.
- Cut under the front leg and stay close to ribcage and keep cutting to the spine.
- Pay careful attention not to cut into the back loins at the top of the spine.
- Place shoulder into a game bag to keep meat clean.
- Removing the Back Loins
Back loins (Back Straps) run along either side of the spine.
- Find the start of the loins which is located near the spine at the top of the hindquarter.
- Cut across the muscle group.
- Place knife blade parallel to the spine until it hits the bone.
- Make a long cut along the spine to the base of the neck, keeping the blade as close to the bone as possible.
- Remove the loin by cutting away from the ribcage.
- Slice the meat at the neck. The average length of this muscle group is three feet and the diameter of a baseball.
- Place back loins in game bag.
- The tenderloins, which are along the spine on the inside of the body cavity, can be removed the same way as the back loins.
- Removing the hind quarters
Image Source: Adrienne Yancy/Obie Williams
Saw Method
- To remove the hindquarters either saw or cut them from the carcass.
- Sawing is the fastest and quickest way to reach the meat.
- Saw across the spine where the end of the loin meets the hindquarter.
- The carcass is now split. Last cut is to split the spine from the tail to where you cut the spine in half.
- Repeat steps 1-4 for the other side.
Knife Method
- Lay animal on its side
- Find where the point of the back loin ends and start cutting into meat deeply.
- Continue cutting towards the tail.
- Spread the elk’s legs.
- Find the point where the hindquarters come together and cut down to the middle of the pelvic bone.
- Lay the animal on its back and cut straight down between the quarters until you hit bone.
- Cut meat away from the bone by using the knife and follow pelvic bone while someone helps to pull the leg away from the carcass.
- One should continue to cut until the ball joint is reached.
- Ball joint should be cut all the way around to separate it. A second person can assist in putting the hindquarter into a game bag.
- Finishing
- Rib and neck meat is easiest to remove.
- Do one side at a time to ensure that meat stays clean.
Deboning
Another way to cut the meat off the animal is deboning. Processing elk is similar to that of deer. Processing an elk can be looked at as being somewhat easier than a deer because of the elk’s larger and well-defined muscle groups. This process saves extra pounds because you are not carrying bones. It can lighten your load by up to 50 pounds. There is approximately three times more meat on an elk than a deer. It is worth the time to remove extra weight when you are packing out and hiking back to camp.
To quarter or debone? Pick the option best for you and your surroundings. Quartering is quicker but packs will weigh more. Deboning takes more time and saves on poundage. If weather conditions and daylight hours work in your favor, you have the time to debone if you choose.
Field dressing is not necessary because the hunter is taking the meat off and leaving the rest behind. Heat, dirt and moisture can still damage the meat. One needs to remove meat quickly and keep the processing site clean.
Steps to deboning: Gutless
- Lay the elk on its side.
- Start by cutting the hide by making an incision down the spine from the base of the neck to the start of the rump.
- To cut through the hide on rear quarter, start at the lower spine and cut down (towards the body cavity) to make a cut in front of rear quarter.
- Follow the cut down the middle of the thigh, continue cutting down toward hoof but stopping at the hock. The hock is the biggest joint on lower hind leg.
- Make a circular incision around the hock of the hind leg.
- To cut hide on foreleg, start at base of neck, cut straight down in front leg by going with the grain of the hair. Incision should run just behind the shoulder blade.
- On foreleg, cut along the backside (side closest/proximal to tail) and make a circular cut above the knee.
- Peel off the hide on fore and hind leg, body cavity and rear leg so hair is less prone to be in contact with the meat. Also muscle groups will be seen more easily.
- Cut around shoulder blade on front limb starting with the side of the blade closest to head. It helps to raise the front leg with which you are working. When front quarter is cut off, set off on side on clean surface to debone later.
- Move to the rear quarter. Follow and cut tendon lines. Tendon lines separate muscle groups.
- Continue working on muscle groups on rump and place meat chunks in game bags.
- To cut out backstraps, start at rump, cut up against the spine and work your way to neck meat to retrieve back straps.
- Make incision under spine behind last rib and cut backward. Take precaution to not cut open the stomach or intestines. Make two incisions perpendicular to cut along spine to reach and retrieve tenderloin.
- Take hand and rub back and forth to reach the tenderloin.
- After both sides are completed, leftover meat left on the carcass can be trimmed and added to the game bags.